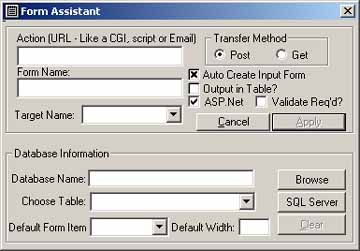
Other Choices to be made are Form Name, Target Name, Output In Table, and Auto Create Input Form. Assigning a Form Name comes in handy when you want to automatically create focus on a certain Form Field (another feature in ASP Express). Target name allows you to put in your own, or the standard targets possible.
Now, we get to the powerful parts - If you choose Output in Table, you will get just what it sounds like - a Table Format, with the labels on one side, in a cell, right justified, and the Form Fields in a second column/cell.
Auto Create Input Form, again, does just what it sounds like it does. When you click this check box, the form automatically expands so that you can choose an Access database or SQL Server(7 or 2000) Table from which to base the form contents. Click on 'Browse' to browse for an Access database, or 'SQL Server' to choose the SQL Server table needed. Of course, Enterprise Manager must be installed on your computer for this to work to it's fullest potential.
Then, when the Table pull-down list is populated, choose the table the form will use. You can choose the default form item type (text, checkbox or radio button), and the default width of all the text boxes.
Now - click the Apply button and, voilá - you have an input form based on the database & table of your choice!
'ASP.Net' is the checkbox needed for creating your output in ASP.Net format- click on this box and it will put the correct syntax designations inside the Form Tag. It also will allow you then, to check whether or not you want ASP.Net Validation controls added in your auto-form creation.